For installers
Installing Kourai.
Plan the cameras, install the hardware, calibrate in the installer portal, then hand the home over.
Professional installation is recommended. Read the whole guide before you start.
Before you go.
In the box
- Kourai Hub
- One per home. Its QR code, on the side, links it in the portal.
- Power adapter
- Use only the adapter in the box.
- Ethernet cable
- For the hub.
- Getting started card
- Its QR code opens kourai.com/getting-started for the homeowner.
Supported cameras
- Models
- Reolink RLC-840A and RLC-1240A. The hub doesn’t take any other model.
- Condition
- New, straight from the box. A camera that was set up before, or used with another Kourai hub, must be factory reset first.
- Where they come from
- Kourai supplies them with the first systems, or the homeowner uses supported ones they have. Mounts and screws come in each camera’s box. Supported cameras
You bring
- Portal sign-in
- The installer account your company invited, or an installer token from your company.
- PoE switch
- 802.3af/at, gigabit, with a PoE port per camera plus ports for the hub and the router uplink.
- Cable
- Outdoor-rated Cat5e or Cat6, RJ45 connectors, crimper and cable tester. Keep each run under 100 m (328 ft).
- Weatherproofing
- RJ45 boots or junction boxes, exterior sealant and grommets.
- Tools
- Drill and bits, ladder, fish tape, cable clips and label tape.
- A smartphone
- With a camera, a browser and internet, for the portal and the walk-around video.
The home needs
- Internet
- Working broadband, and a free LAN port on the router.
- One network
- The hub and cameras on the same subnet, /20 or smaller, with DHCP on. No guest network, VLAN split or client isolation between them.
- Power
- An indoor outlet for the hub. The cameras are powered over Ethernet, so no new electrical work is needed.
- Locked-down networks
- If the network blocks outbound traffic, contact Kourai support for the hosts and ports the hub needs. No inbound ports are needed.
Plan the cameras.
These apply to every camera in the system.
Rigid mount.
Mount only to structure that doesn’t move: house walls, eaves, solid posts. Never fence panels that flex, thin poles that sway, or trees.
Correct: A house wall or eave, or a solid post. Avoid: A fence panel, a thin pole or a tree branch. Height and angle.
Mount 8–14 ft above the ground, angled down at the area you’re watching. Higher, steeper views detect better than shallow ones.
Correct: 8–14 ft up, tilted down. Avoid: Head height, looking straight across. Clear sightline.
Keep the view clear, now and later. Think about plants that grow, umbrellas that open and gear that gets stored.
Correct: Nothing between the lens and the area. Avoid: An umbrella or shrub cutting into the view. Sun.
Where you have a choice, don’t point a camera into the sunrise or sunset. Lens flare hurts detection and calibration.
Correct: Sun behind or beside the camera. Avoid: Facing a low sun, the frame washed out. Privacy.
Frame only the areas you’re watching. Keep neighbouring properties out of view wherever you can.
The view ends at the fence line. Cable path.
One Ethernet run from each camera back to the PoE switch. No AC power is needed at the camera.
Clipped along the eave, a drip loop, a sealed grommet, down to the switch.
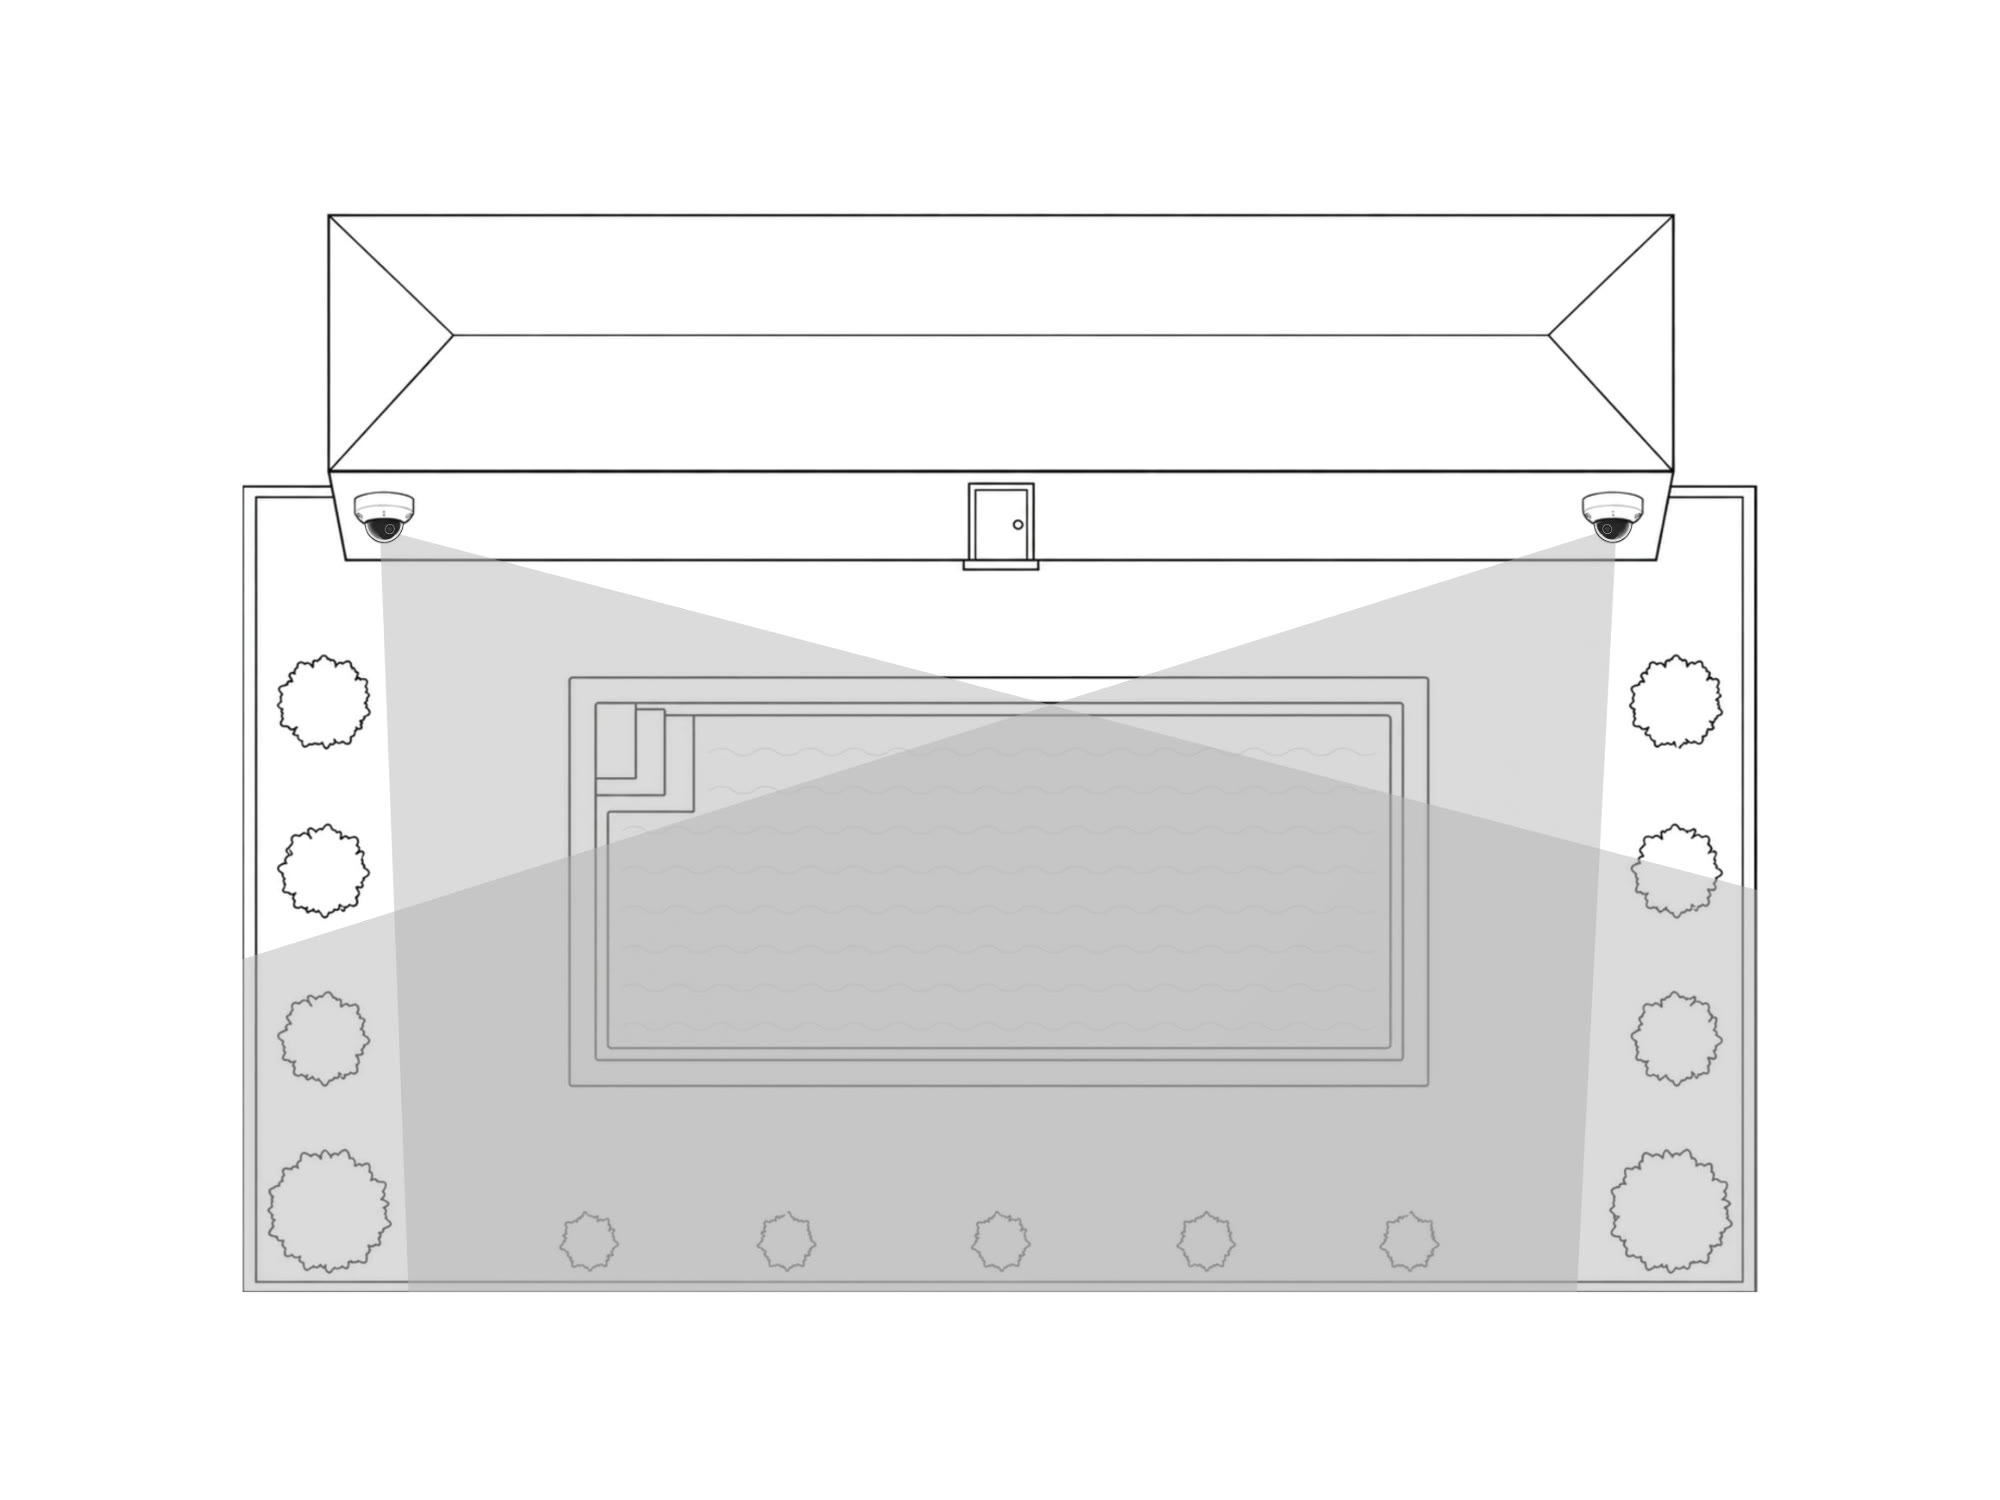
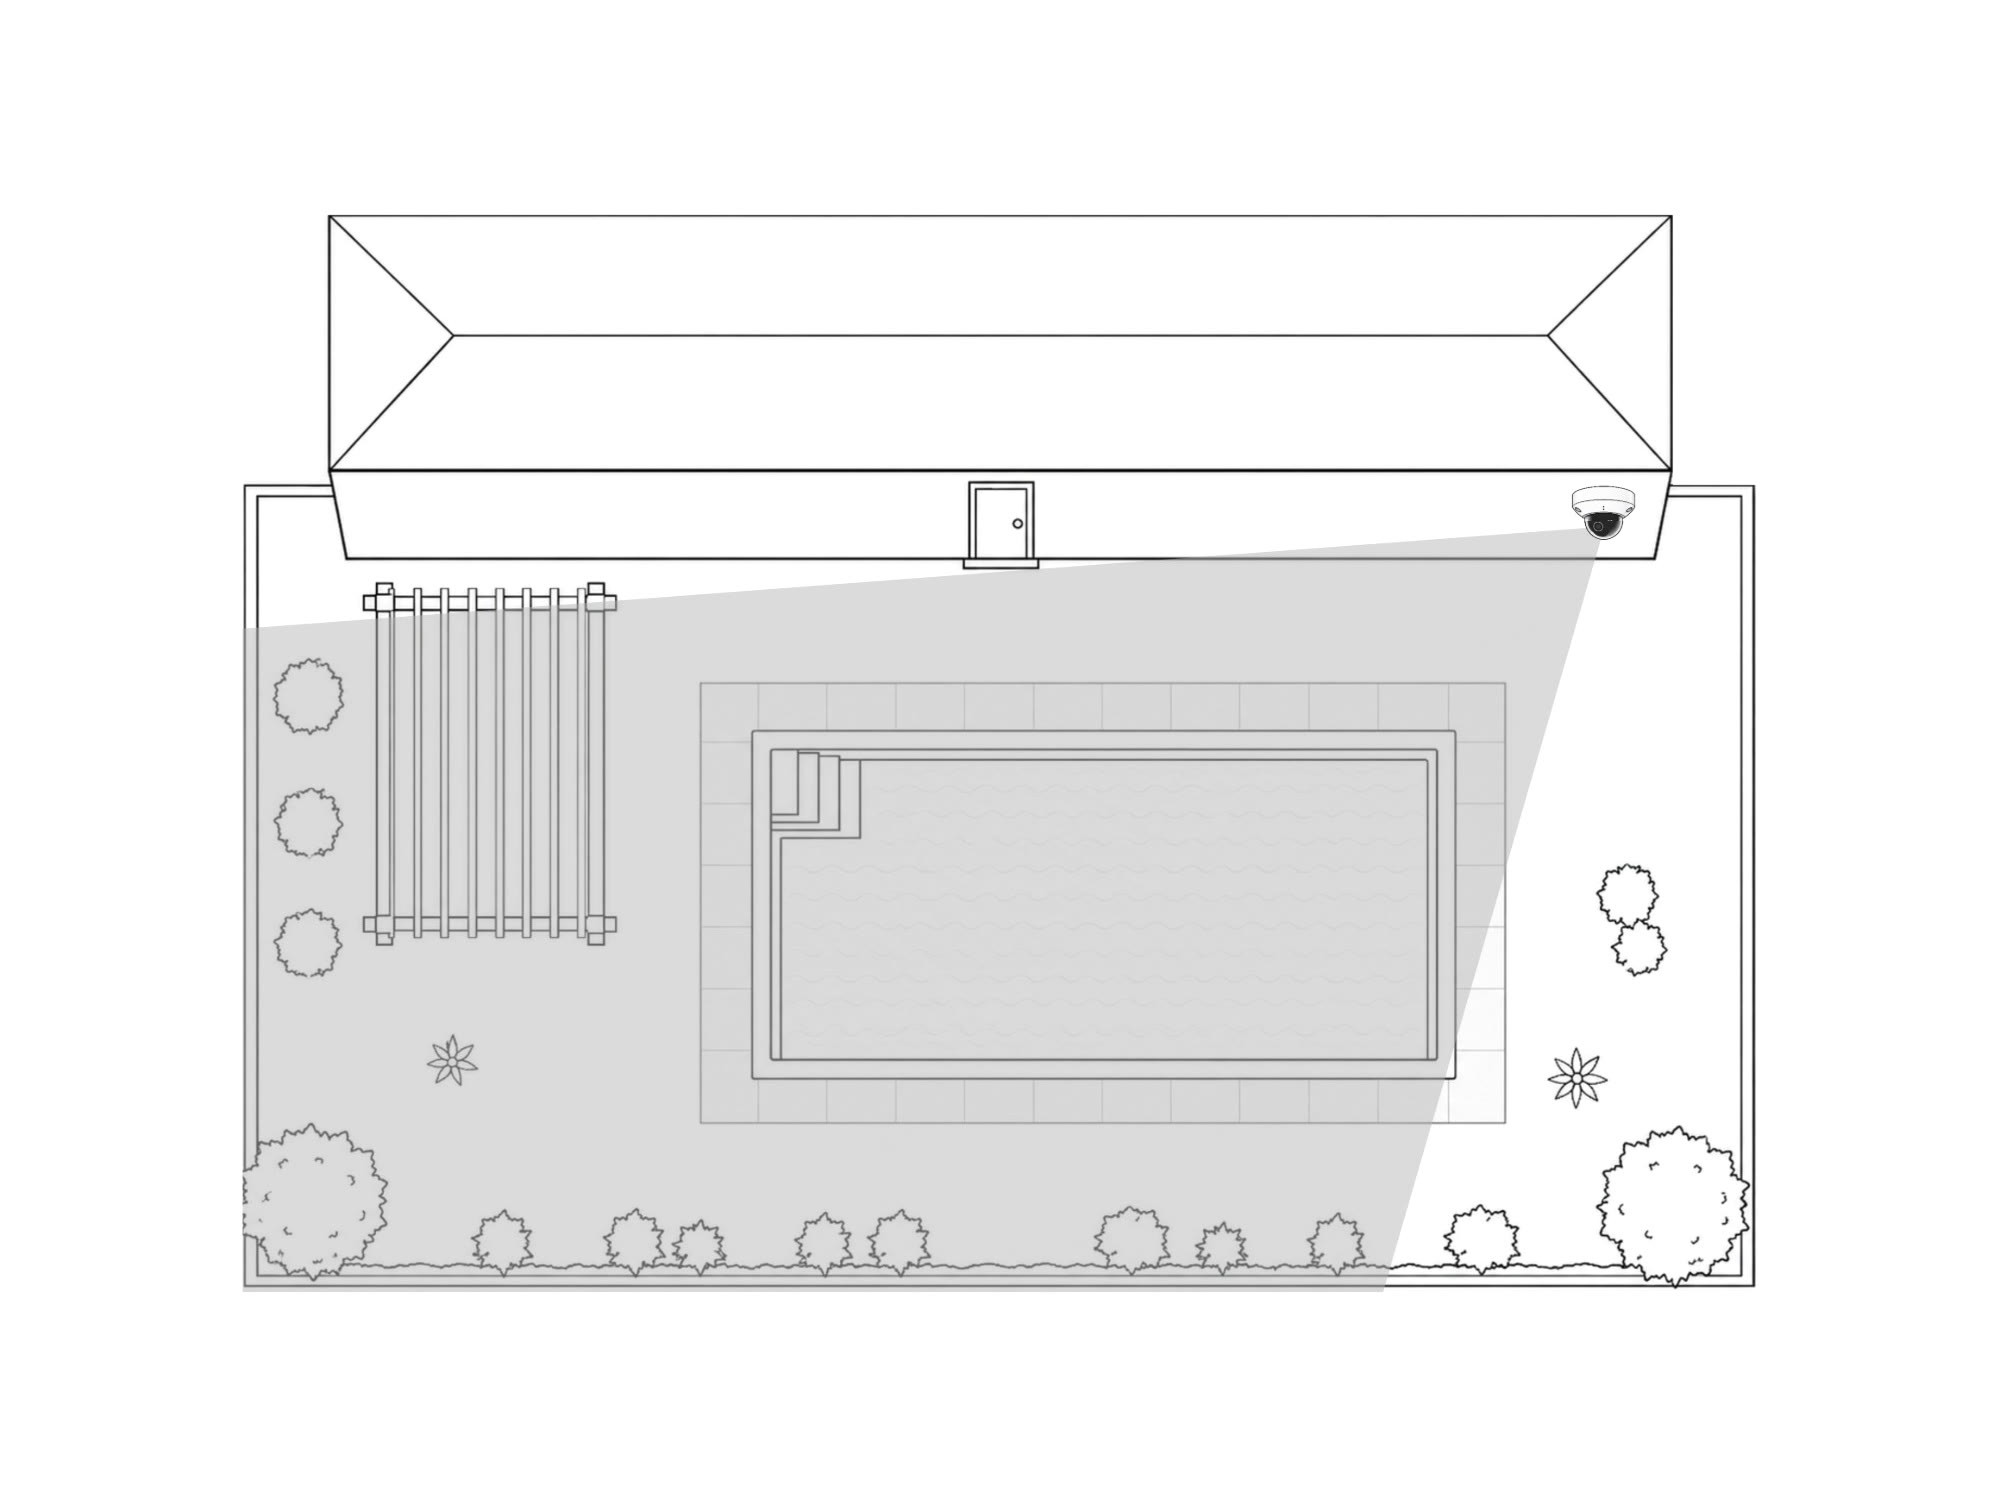
A pool needs two cameras.
Pool safety needs better detections, and a view of the water from more than one side, than one camera can give. Both pool cameras follow the guidelines above, plus these.
Both cameras see the whole pool.
Keep all the water, including steps, tanning ledges and any attached spa, plus the first 3 ft around the edge, in both cameras’ views. Water only one camera sees is still watched, with lower-quality detections. If moving a camera fixes it, move it.
See the approach.
At least one camera sees the deck and yard between the doors or gates and the pool’s edge, so a person is in view well before they reach the water.
Different sides.
Put the cameras on different sides or corners, so they see the water from different directions. Side by side, the second camera adds little.
Quick check: in the portal’s Cameras step, tap Reposition to open a camera’s live view while you aim, then Recapture. Get the whole pool, edge to edge, in both views before you tighten the mounts.
Good placements
Placements to avoid
Cover every way in.
Security cameras watch for anyone entering the property who shouldn’t be there. Each follows the guidelines above, plus these.
Coverage.
Plan a camera for each way onto the property: front door, driveway, side gates and back-yard access. An entry with no camera is a blind spot.
Cover the approach.
Keep each entry, gate or driveway fully in frame, with the camera facing the way people arrive, so they’re seen coming.
Backlight.
Don’t frame a door against strong backlight, like glass with a low sun behind it, or a bright driveway behind a shaded porch.
Good placements
Place the hub.
Indoors only, somewhere ventilated, with an outlet and a cable path to the switch. Not outdoors, not in a sealed cabinet, not in direct sun.
The hub has a fan you can hear. Put it where people don’t spend time, like a garage, utility room or closet, not a bedroom or living room.
There’s no status light to read. The portal’s Device step tells you whether the hub is online.
Install the hardware.
Site check
- Walk the property and choose the camera positions, two for a pool.
- Confirm a cable path from each position to the switch. One Ethernet run per camera carries power and data.
- Check the network: broadband works, the router has a free LAN port, and the hub and cameras will share one subnet.
- Decide what must be moved or kept clear of the views: umbrellas, plants, string lights.
Hub and switch
- Put the hub in its spot, off the floor.
- Put the PoE switch near the hub. Connect the switch’s uplink to a LAN port on the router, and the hub to the switch with the Ethernet cable from the box.
- Connect the hub’s power adapter. It starts by itself and connects to Kourai on its own; give it a few minutes.
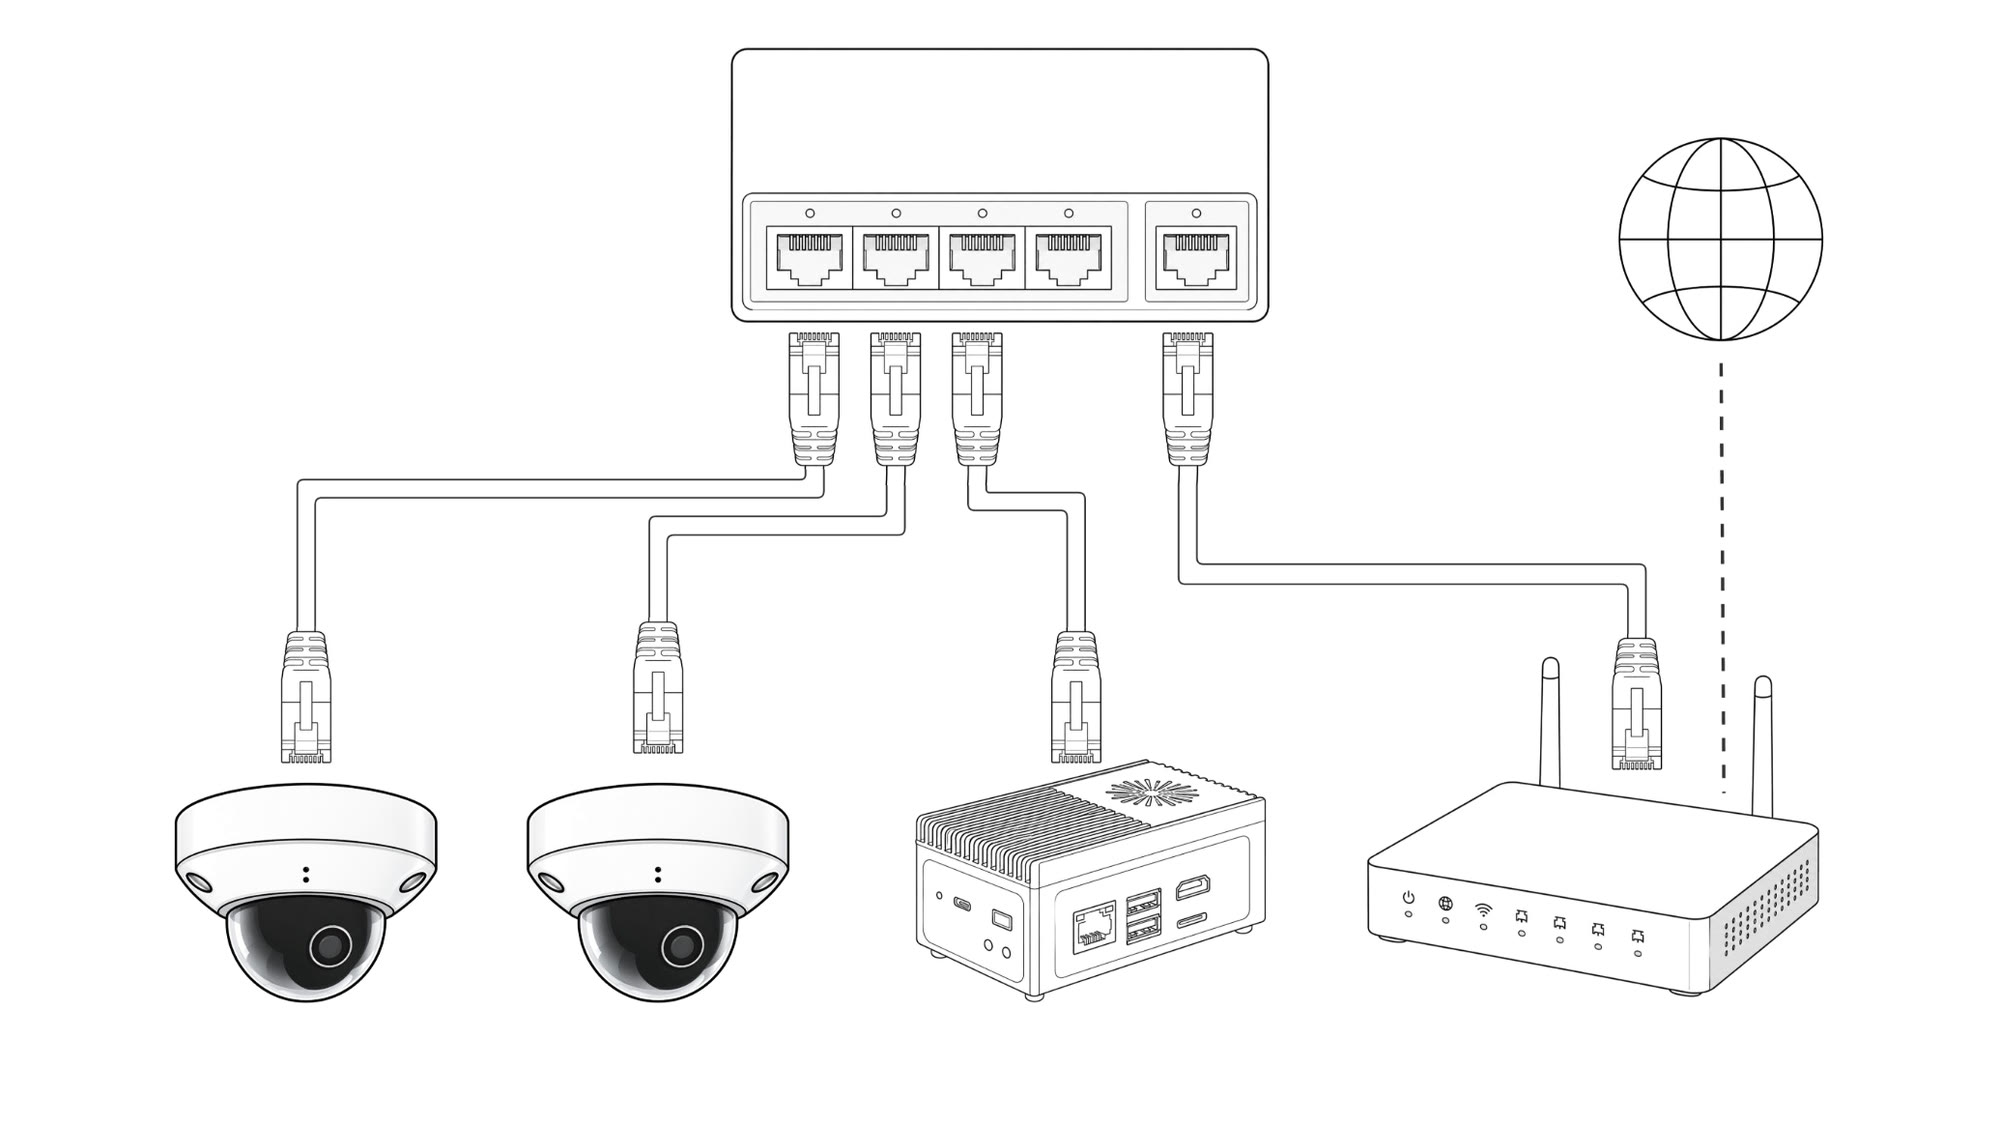
Cameras
- Mount each camera with the hardware and instructions in its box, at the position you chose.
- Run one outdoor-rated Ethernet cable to each camera. Secure it every 3–4 ft, leave a drip loop at the camera, and never run it alongside AC lines.
- Terminate, test with a cable tester and label both ends by location, like “pool east”. The portal numbers cameras its own way. Weatherproof the RJ45 at the camera.
- Connect each camera to a PoE port on the switch. The hub finds and sets up the cameras itself.
Link the hub in the portal.
Mount and connect every camera first: the portal lists them when it reaches the Cameras step.
Sign in. Open install.kourai.com on your phone and sign in with the account your company invited: Google, email or phone. Using a token instead? Tap “Have an installer token? Use it instead.”
Register the hub. In New Device, tap the scan icon and scan the QR code on the side of the hub, or type its UUID. Tap Register, choose the home’s time zone, then Continue.
Let it update. Device Software checks the hub. If it says the software is outdated, tap Update Device Now. It can take several minutes; the next step opens by itself.
Calibrate.
With the cameras mounted, the portal takes you through four steps. Plan for 20–35 minutes, most of it waiting for validation.
Cameras. Wait for the hub to find the cameras; they’re listed as Camera 0, Camera 1 and so on. Clear the area of people and pets, check each frame shows the whole pool, and tap Capture All Frames. To fix a framing, tap Reposition, aim with the live view, then Recapture. Tap Confirm All Frames and stay out of view until “All frames saved.”
Scale. Stand up straight where every camera sees you head to toe, with no one else in view, and tap Capture All Cameras (or have someone tap it for you), then Confirm All. Enter your height in feet and inches, accurately: it sets the real-world scale of the whole scene. Then tap Confirm Calibration Data.
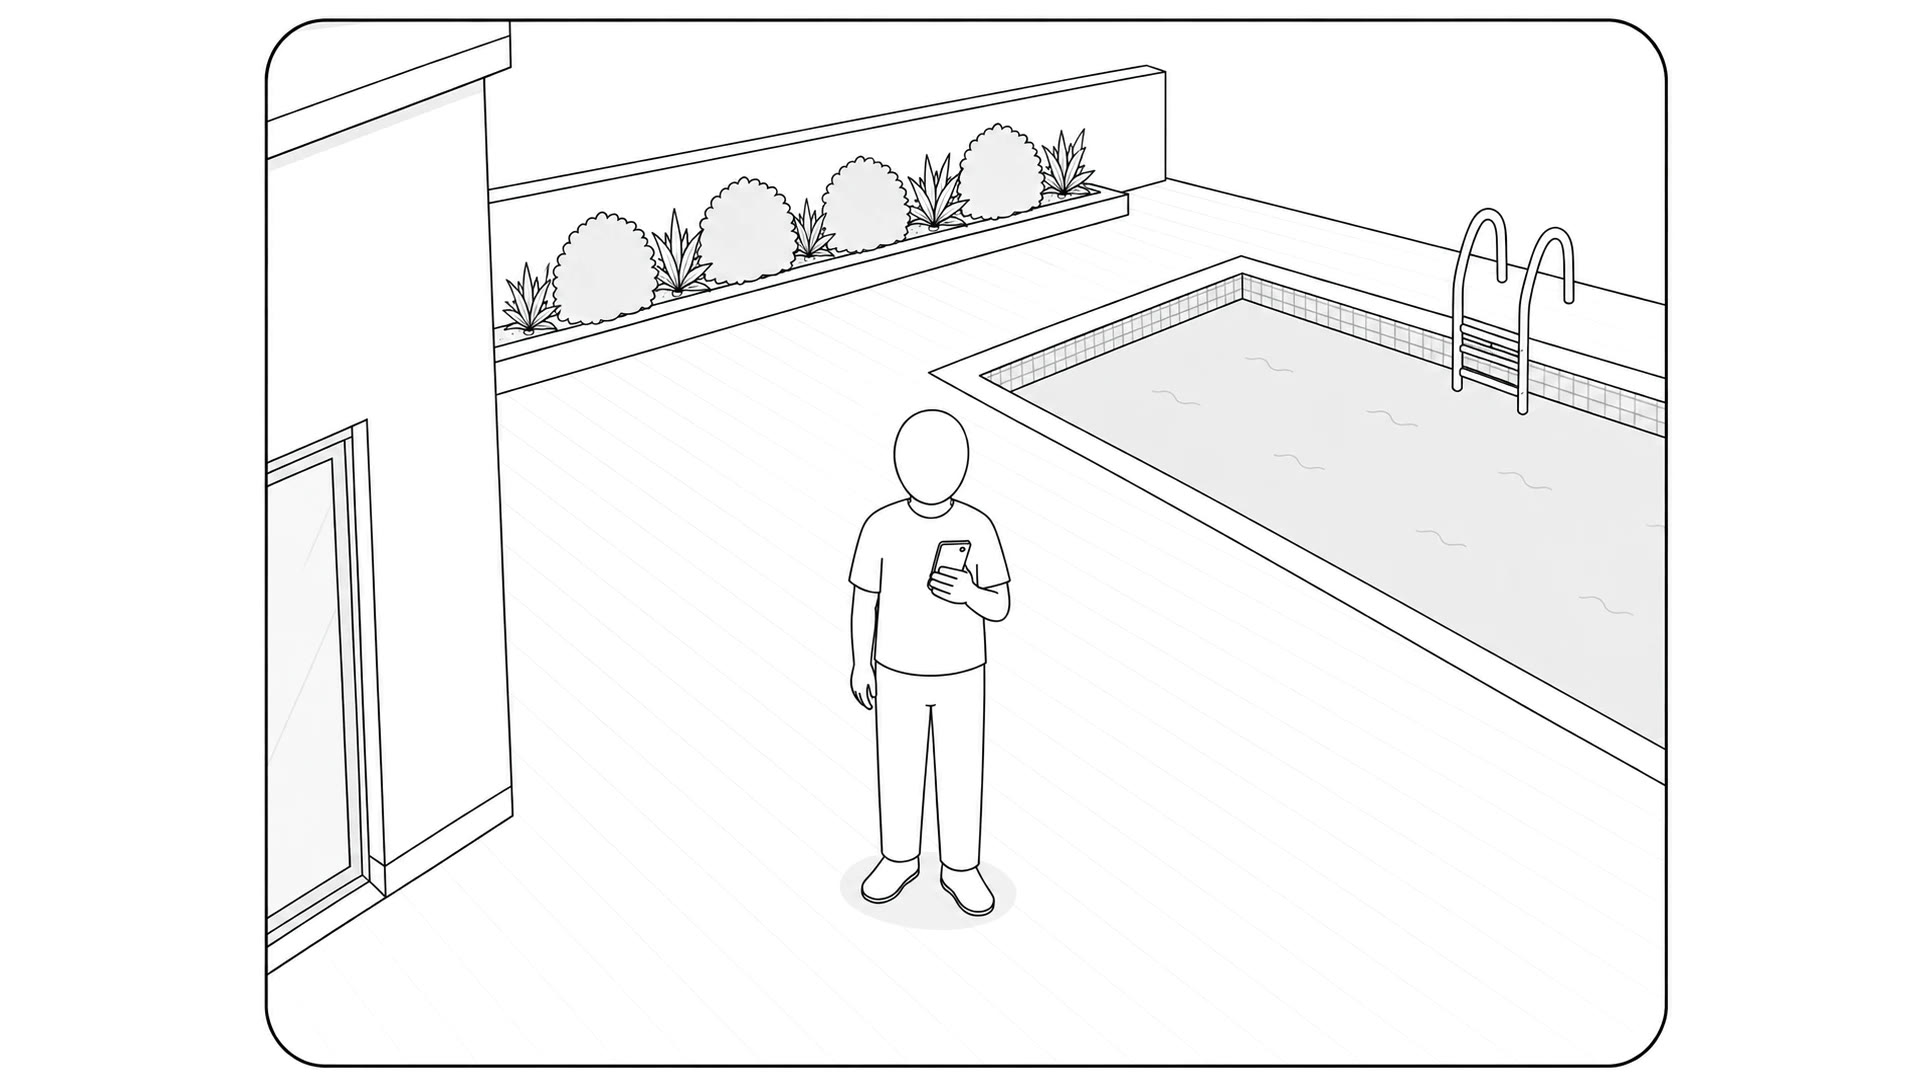
Head to toe in every camera, and only you. Video. Record the walk-around in the phone’s camera app, by the rules below, then upload it under Scan Video: MP4 or MOV, 10 seconds to 60 minutes, under 4 GB. Use the home’s Wi-Fi and keep the page open: closing it means redoing Cameras and Scale. If the upload stops, choose the same file again to resume.
Validate. Tap Start Validation and wait for “Installation Complete.” The 3D model then finishes in the background; follow it under Installations. When it’s ready, Kourai lets the homeowner know in the app.
The walk-around video.
The video is how Kourai learns the shape of the property, and how it places each camera in it. Follow every rule.
Landscape, at chest height.
Hold the phone sideways at chest height, and tilt it up and down as you go so the scan takes in the ground and what’s above it.
Correct: Landscape, at chest height. Avoid: Held upright, in portrait. Walk slowly.
Fast moves blur frames and leave holes in the result. Move slowly and steadily.
Correct: A sharp frame from a steady walk. Avoid: A blurred frame from hurrying or turning. Walk everything that’s watched.
Anything more than about 33 ft (10 m) from where you walk is left out of the 3D model. Pass under each camera and through every way in.
One full loop.
Walk all the way around the outdoor property and finish on the exact spot you started.
One loop around the pool, start and finish on one spot. One or two steps back from the edge.
On the edge, the phone sees only water. A step or two back keeps the deck, furniture and ground in frame.
Correct: Water, deck and furniture together. Avoid: Only water and coping. Raise the phone to each camera.
At each mounted camera, lift the phone toward its height and point it the way the camera points, so the phone sees what the camera sees. Then lower it and carry on. Validation fails if any camera isn’t placed this way.
Lifting the phone toward a mounted camera. Circle complex objects.
Tables, rock features and planters need to be seen from more than one side. Walk part of the way around them.
The path bulges around a patio table. Watch for lens flare.
If you see flare on screen, walk that area again from another angle, with the sun to your side.
Correct: Sun to the side, the scene clear. Avoid: Facing the sun, flare across the frame.
Hand the home over.
The homeowner signs in first.
The homeowner installs the Kourai app and scans the QR code on the side of the hub before anyone else does. The first account to join becomes the system’s administrator; everyone else joins by their invite.
Give them the getting started card.
Its QR code opens kourai.com/getting-started, which walks them through the app. The app tells them when their home is ready.
Critical Alerts on every phone.
Once the homeowner is in, each caregiver installs the app, joins by invite and allows notifications, including Critical Alerts.
Leave things as they are.
Tell them not to move, re-aim or block the cameras, and not to unplug the hub, switch or router. If a camera gets bumped or moved, they contact you or Kourai.
The homeowner’s own guide: kourai.com/getting-started
Troubleshooting.
- “Waiting for your vendor”
- Your account isn’t linked to a company yet. Ask your company to invite the email or phone number you signed in with, then tap Check again.
- “Invalid or expired token”
- Tokens are case-sensitive: paste the whole token. If it still fails, it has expired or been revoked. Ask your company for a new one, or, signed in with your account, use Settings › Installer token › Generate.
- The QR code won’t scan.
- Allow camera access and add light; the scanner has no flashlight. Or type the hub’s UUID into Device UUID.
- “Device is offline”
- Check the hub’s power and Ethernet, and that the router has internet. Restart it: unplug the power, wait 10 seconds and plug it back in.
- “No cameras discovered on this device.”
- Check each camera is on a PoE port, powered and on the hub’s network, then tap Retry Discovery. Don’t refresh the page. A camera that was set up before needs a factory reset.
- “Camera model unrecognized”
- Only the Reolink RLC-840A and RLC-1240A work with Kourai. Swap the camera.
- A camera is offline.
- Check the PoE port light. Reseat the RJ45 at both ends, test the cable again, try another PoE port, and check the switch’s power budget.
- The upload fails or stalls.
- Use the home’s Wi-Fi and move closer to the router, then choose the same file again to resume. Don’t close the page. The video must be MP4 or MOV, 10 seconds to 60 minutes, under 4 GB.
- “Too few frames matched the scene”
- Walk again, slower, with more overlap between what the phone sees from one moment to the next.
- “Static cameras not recognized in the scan”
- Walk again, and at each camera raise the phone toward it and point it the way the camera points.
- “Scene reconstruction incomplete”
- Walk again, slower, in good light, covering every area the cameras watch.
- “Couldn’t read the scan video”
- Record the walk-around again and upload the new file.
- Any other validation message
- Email support with the message and the Task ID on screen.
- After any failed validation
- Tap Start New Validation, register the same hub again and redo Cameras, Scale and Video. The home is kept.
- Validation runs for a long time.
- It has no time limit. If it seems stuck, email support with the Task ID on screen.
Completion checklist.
Go through it with the homeowner before you leave, and leave them a copy.
- Everything in the box was there and is installed.
- In the portal’s camera frames, the whole pool is in view (water, steps, spa and the edge), in both cameras wherever possible, and at least one camera sees the way from the doors and gates to the pool.
- Every camera mount is rigid and tight, holes are sealed, and drip loops are in place.
- The hub is indoors, ventilated, on an unswitched outlet, and online.
- Calibration is done: frames saved, scale photos taken with your height entered, the walk-around video uploaded, and “Installation Complete” on screen.
- The homeowner signed into the app first and scanned the hub; caregivers joined by invite with Critical Alerts on.
- The homeowner has the getting started card.
- The homeowner knows not to move, re-aim or block the cameras, or unplug the hub, switch or router, and to call if a camera gets bumped.
Need a hand?
Email Kourai support with the hub’s UUID, the portal step you’re on and a photo of the problem.
support@kourai.com